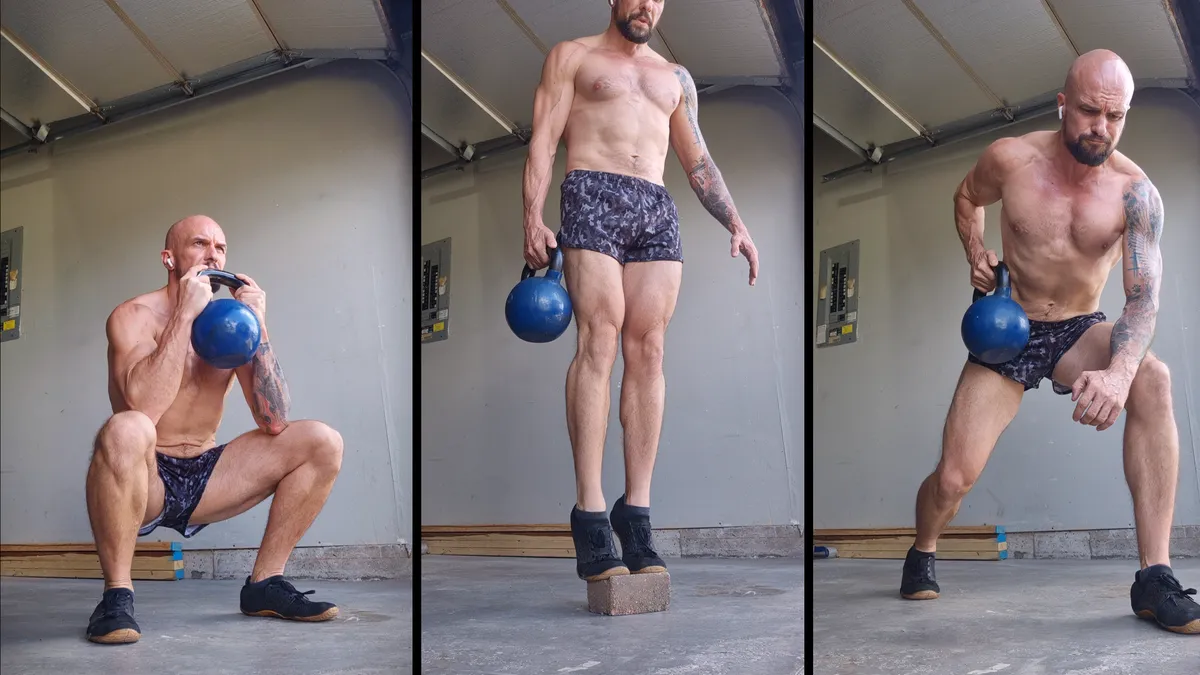
One 50lb kettlebell and a slab of garage floor. That is the whole kit list. I pushed some stuff against the wall to clear a space and that was the setup finished.
Mid-afternoon, sun up, door open. I train in the daylight on purpose. Sunlight in your eyes is a real stimulant for the nervous system, and on the days I skip a pre-workout it does most of the same job for free. It is the cheapest thing you can add to a session.
This leads with legs and adds a pull onto the end. It is also completely no impact. Nothing here jumps, drops, or bangs the floor, so a living room or a basement works as well as a garage. You need about the space of a yoga mat and enough headroom to stand up straight.
The Workout at a Glance
| Exercise | Sets | Reps |
|---|---|---|
| Straight Leg Kettlebell Deadlift | 3 | 15 |
| Goblet Squat | 3 | 15 |
| Standing Calf Raise | 3 | 15 |
| Side Crunch | 3 | 15 each side |
| Single Arm Supported Row | 3 | 15 each arm |
Fifteen reps across the board. That is not a training philosophy. It’s simplicity. One bell means one weight, so the rep count is the only dial you have left.
If you own two or three bells you have more options. You can vary the rep range by move, or run a spread down a single exercise. Twenty-five, then fifteen, then ten across three sets, going heavier as the reps drop. With one bell we’ll be doing sets of 15.
There is a mental hurdle here if you pay for a gym. Running a session in the garage with one bell can feel like a step backward, like you are letting a membership sit idle to do less work. That feeling is worth pushing through. Having to adapt around limited tools is exactly what makes the next gym session more productive. You come back better at solving a workout, not worse.
I recommend going with a heavier bell than you think you need. Every lower body move here is two handed, so you are splitting the load across both arms anyway. Most people are able to handle rows with more weight than expected. A bell light enough to press overhead is too light for this session. If you are still buying, this is the cost-effective cast iron bell I would point you at on Amazon.
The order runs compound first. Deadlifts open because they warm up the whole posterior chain before you ask the legs to squat. Then the squat, then the isolated leg work, then abs, and a quick lat exercise to close it out. Rest is by feel rather than by clock. Keep the sets frequent enough that you do not cool off, but do not start the next one until you know you can get all 15.
Warm Up First
Do not skip this because it is one bell and high reps. Light and repetitive is exactly the setup where people get lazy and tweak something.
Five minutes of mobility is enough. Hip circles, some bodyweight squats, and a set of the hinge with no weight. The physical part matters, but the bigger job is mental. A warm-up gets your head ready to execute a compound movement properly, and the compounds are where an injury actually comes from.
1. Straight Leg Kettlebell Deadlift
Bell on the floor between your legs, both hands on the handle, legs close to straight. A soft bend in the knee is fine. Locking them out rigid is not the goal.
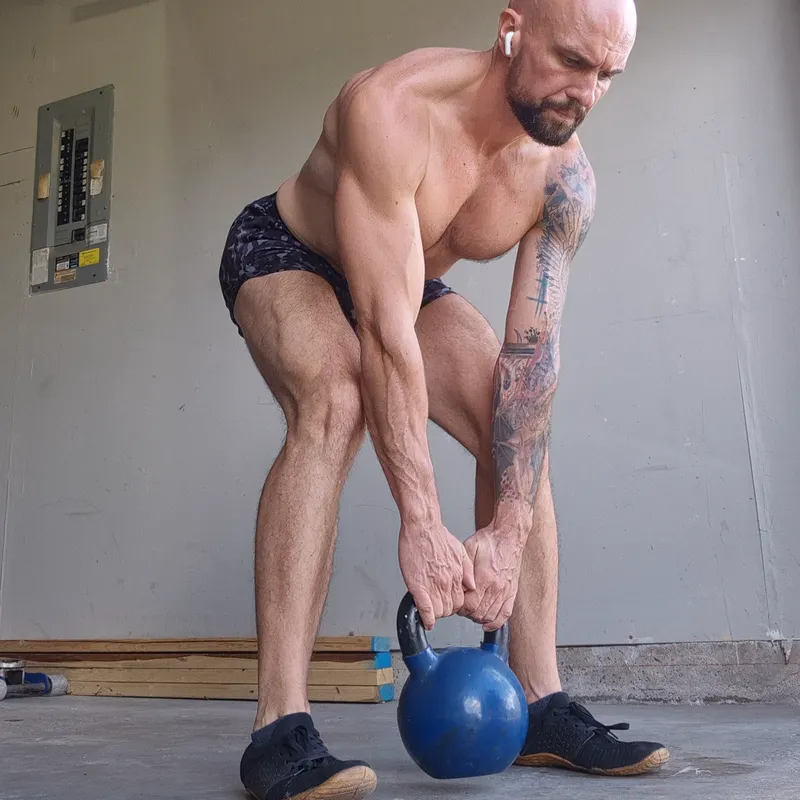
Push your hips back and let the bell travel down close to your shins. Stand up by driving your hips forward and squeezing your glutes at the top. The straight leg version puts far more of the work into the hamstrings and glutes than a bent knee pull does, which is the point of opening with it.
Keep your back flat from your hips to your head. The second it rounds you are loading your spine instead of your hips, and that is the whole reason people end up scared of deadlifts.
This will feel like the easiest move of the five. The hinge is your strongest pattern, so a bell that challenges you on the row will feel light here. That is fine. It is doing its job as a warm-up for everything below.
Sets: 3 | Reps: 15
2. Goblet Squat
Squats like goblet. Hold the bell up at your chest with both hands under the handle and squat down between your hips.
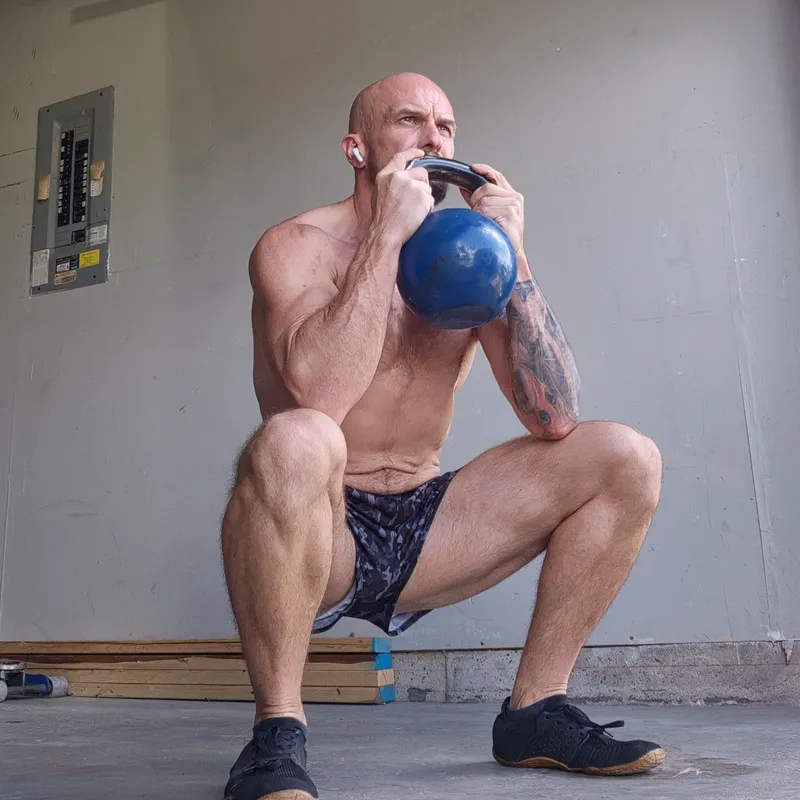
Holding the weight in front is the trick. It acts as a counterbalance, so you can sit straight down instead of tipping forward the way a lot of people do with a bar on their back. Most people can hit a deeper squat with a goblet than with anything else.
Go all the way down. Let your elbows travel down inside your knees at the bottom. Push your knees out against them. Hold for a beat. Then drive up through your whole foot.
Sets: 3 | Reps: 15
This is where short shorts earn their inseam, along with the bent over row later. Maximum comfort and maximum mobility. Nothing bunching at the hip when you sit into the bottom of a squat and nothing gripping your quad on the way up. Papi does not save them for the gym either. The garage counts. And if the door is up, take a second to admire the view admiring you.
Soffe Original Ranger Panty (Silkies)
3. Standing Calf Raise
This was my favorite of the five, and not because I like calf raises.
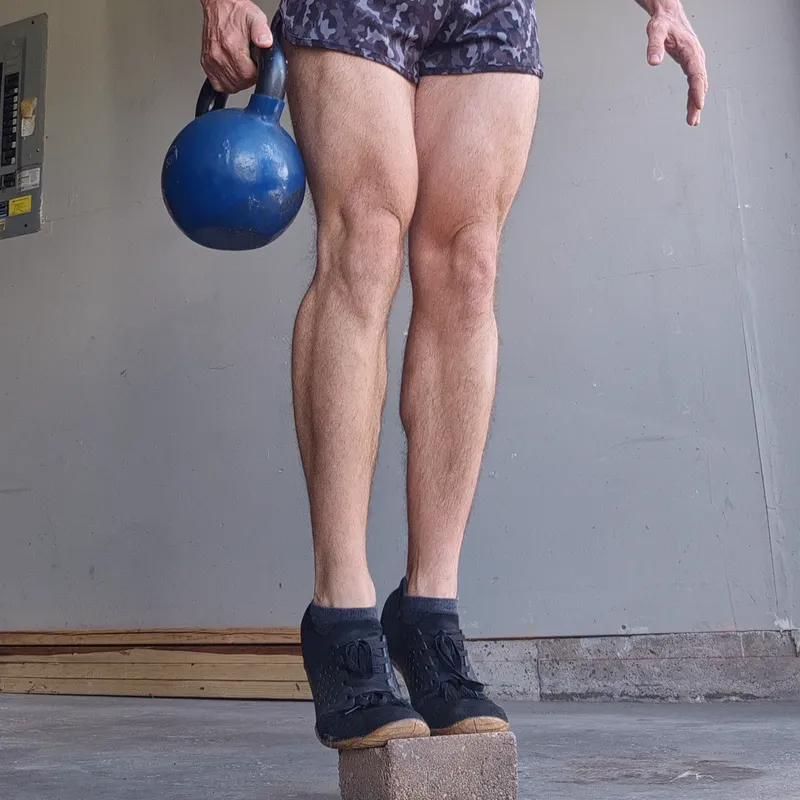
Calves need range of motion and flat ground gives you none, so you have to stand on something. I used a garden stone from the yard. Just find something heavy enough that it does not slide out from under you.
The interesting part is that you have to go and find it. Sourcing an implement adds a layer of thinking to the workout that a machine at a gym removes entirely. You look around. You judge whether a thing will hold you. You set it up. That is cognitive work, and it is part of training even though nobody counts it.
There is a physical version of the same argument. Uneven, unfamiliar tools force your body to stabilize in ways a fixed machine never asks for. You get a neuromuscular adaptation out of it. That is a tension progression sitting completely outside the mechanical load, and you cannot buy it by adding another plate.
Put the balls of your feet on the stone with your heels hanging off the back. Hold the bell in one hand and use the other for balance. Drop your heels below the stone until you feel the stretch. Then press all the way up onto your toes and hold at the top.
Do not bounce. Bouncing hands the work to your Achilles instead of the muscle. Pause at the bottom, pause at the top, and 15 reps will feel like a very different number.
Footwear matters more here than anywhere else in the session. I run the WHITIN cross trainers for this. The flat sole gives you real plantar feedback, so you can feel the edge of the stone through your foot and drive off it. A thick cushioned running shoe squashes under you and swallows half the movement.
Sets: 3 | Reps: 15
WHITIN Men’s Cross-Trainer
4. Side Crunch
The bell is already in one hand from the calf raises, so it stays there. Stand tall with your other hand up by your head. Let the weight pull you down into a bend. Then crunch back up against it.
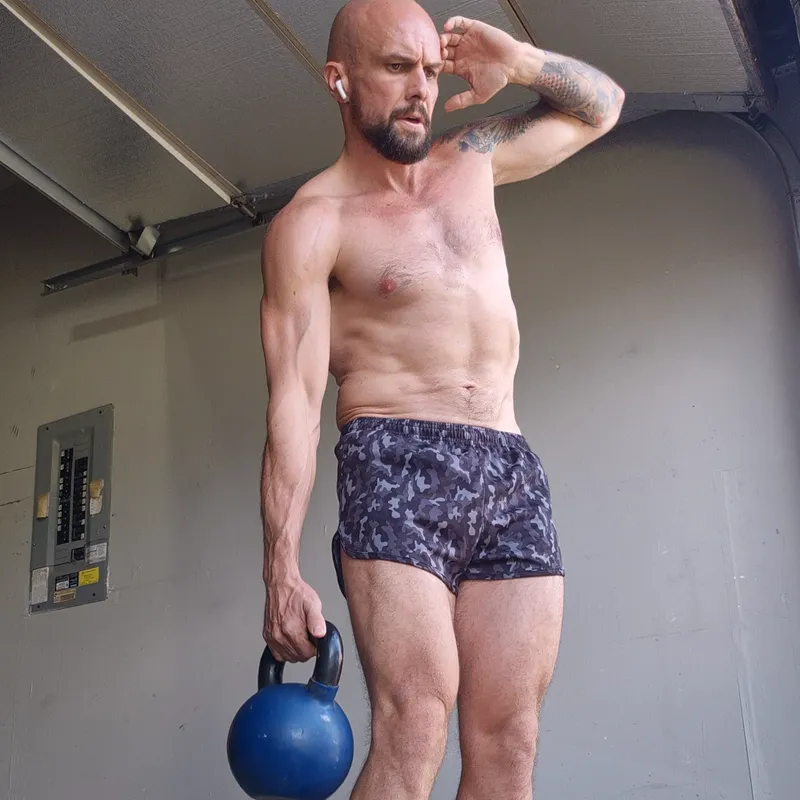
Keep it in one plane. Bend sideways and nothing else. If you start twisting toward the bell or leaning forward, the obliques hand the job over to your hips.
I keep the hand at my head with elbow bent as a way to index the movement. It can be difficult to gauge the flexion and extension of the oblique abdominals. But with your elbow locked in place beside your head, you’ll be able to track the path with the movement of your elbow.
Finish all 15 on one side before you switch the bell over.
Sets: 3 | Reps: 15 each side
5. Single Arm Supported Row
The pull at the back end. Everything up to now has been legs and trunk, so this is what stops it being a pure leg session.
I finish on the back of the body deliberately. The session opens with a posterior chain hinge and closes with a posterior chain pull, so the two ends match. It is also cheap muscle confusion. Your legs have spent four moves doing the same two handed work and the lats get handed something completely different at the end of it.
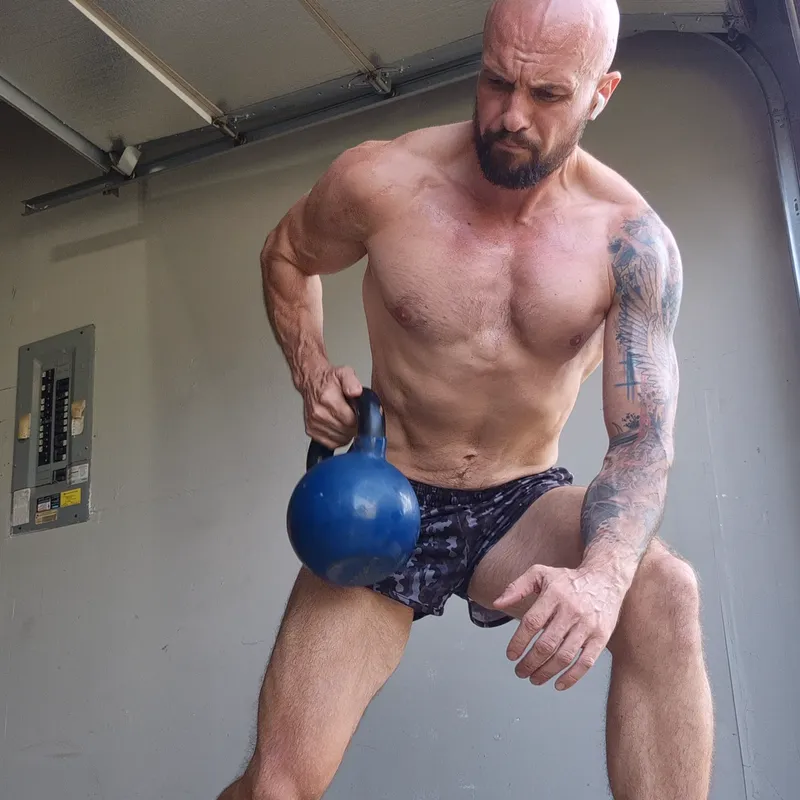
Split your stance and hinge forward. Brace your free hand on your front knee or thigh so your torso has something to rest on. Let the bell hang straight down from your shoulder.
Pull the bell up toward your hip, not your chest. Drive your elbow back past your ribs and squeeze your shoulder blade in at the top. Lower it all the way down and let the shoulder stretch out before the next rep.
The support is what makes this work at home. Without it you are holding your own bodyweight up with your lower back for every set, and your back gives out long before the lats do. Same reason the silkies matter here as much as they do on the squat. You are folded over for 15 reps a side and nothing should be digging into your hip while you do it.
Some days I will tack a few extra sets of something unrelated onto the end here. A curl, a press, whatever I feel like doing. The only rule I hold myself to is that I am not training that body part the next day.
Sets: 3 | Reps: 15 each arm
Making It Harder With One Bell
The problem with training at home is that you cannot add a plate. One bell is one weight. So you make the same weight harder instead.
Slow the lowering down. Three seconds down on every rep turns a light bell into a real set. Pause where the movement is hardest, which is the bottom of the squat and the top of the calf raise. Tighten the rest. Or add reps. Then add a fourth set once the reps climb too high to bother counting.
Then there is the implement route. Change what you are standing on, holding, or bracing against. A different stone, a stair, a thicker handle wrapped in a towel. Same 50lb, different demand.
Frequently Asked Questions
What weight kettlebell do I need for this workout?
I use a 50lb bell and I would not go much lighter. Four of the five moves are two handed or supported, so you are not fighting the weight the way you would on a single arm press. Pick the bell by the row, which is the move that limits you. Then accept that the deadlift and the squat will feel easy with it.
Can I do this workout in an apartment?
Yes. Nothing in this session leaves the floor or gets dropped, so there is no impact and no noise for the neighbors below you. A living room or a basement is fine. You need roughly a yoga mat of space and enough height to stand up straight with the bell.
Can I do this workout with dumbbells instead?
Yes. Every move here works with a single dumbbell. Hold it vertically by one end for the goblet squat and the rest carries over directly. A kettlebell hangs better in one hand for the side crunch and the row, but a dumbbell trains the same thing.
What if I do not have a garden stone for the calf raises?
A stair works. So does a curb, a thick book, or a doorway threshold. You need two or three inches of height and something wide enough to get both feet on that will not slide. Doing them flat on the floor is better than skipping them, but you lose the stretch at the bottom that makes the movement worth doing. Don’t be afraid to hold onto a wall with one or both hands when you start these off. Balance needs to be trained up as well.
How often should I run this?
I run this type of session periodically when I have a gym membership, as a change of stimulus rather than a fixed slot in the week. Other times I will run a macro cycle of nothing but kettlebell work. It depends on your goals, your access, and how interested you are in it. If this is your only lower body training, twice a week with two days between sessions is a solid place to start.